


Beginners
How to choose your first FPV drone?
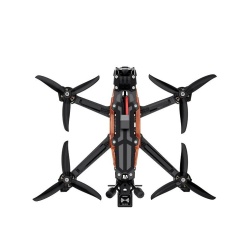
TinyWhoop vs a big drone
Flying an FPV (First Person View) drone is one of the most exciting hobbies in the world, but getting started can be overwhelming. Different goggles, transmitters, frequencies and batteries often raise the question: where do you even start, so you don’t smash hundreds of euros into the ground in the first minute?
If you’re a complete beginner (i.e. a future pilot), you essentially have two options on the table: either get a safe and tiny TinyWhoop mini drone, or jump straight into the deep end and start building a 5-inch freestyle drone. Let’s take a closer look at which direction is right for you.
TinyWhoop – the best and safest way to start
A TinyWhoop is a tiny, palm-sized FPV drone whose propellers are fully protected inside the frame (for example, the BetaFPV series).
- Why it’s good: You can fly it indoors, under the living room table and into the TV – nothing happens to the drone or the living room. It weighs so little that crashes don’t break it.
- Who it’s for: The ideal choice as a first step. Many manufacturers also offer convenient RTF (Ready-to-Fly) kits that include the drone, transmitter and FPV goggles all in one box.
5″ and 7″ FPV drones – pro class and speed
If your goal is to make cinematic videos, fly outdoors in the wind or do big tricks, then your choice is larger frames and more powerful electronics.
- Why it’s good: Larger drones (for example, 5-inch freestyle frames or 7-inch long-range drones) can carry a GoPro camera, handle wind and reach insane speeds. Today’s digital systems like the DJI O4 Air Unit deliver an HD image to your goggles that will leave you speechless.
- The downside: They weigh more and are more dangerous. If you’ve never flown before and make your first mistake into a tree with a 5-inch drone doing 100 km/h, a repair is guaranteed.
Golden rule for beginners: start with a simulator!
Before you actually plug in a battery and spin up the props, there’s one cheap and foolproof trick. Get yourself a proper FPV transmitter (one that supports the modern ELRS protocol, for example), connect it to your computer with a cable and download an FPV simulator (e.g. Liftoff or Velocidrone).
Once you’ve done your first 10 hours of crashes in the simulator and can hold the drone steadily in the air, you’re ready to consider flying for real.
Come and ask for advice and get hands-on!
The FPV world has a huge jumble of standards – digital vs analogue video, different transmitter frequencies and battery charging rules. To avoid buying the wrong things that don’t work together, it’s worth understanding things in person.
Drop by the ClayPitRC model showroom in Tallinn (Laki tn 6). We have BetaFPV mini drones, quality frames, stacks, motors and DJI HD systems in stock. Let’s look at your budget together and put a plan in place to get you into the air safely and with quality gear!
