Categories

ClayPitRC reklaamiosakond ehk hoolikalt valitud kasulikud reklaamid just Sulle

hobizone logo.jpg (4 KB)

Saue HOBIzone (Saue)

Siserada kuni 1/10 skaala mudelitele.
Huviringid, võistlused, huvitegevus.


cufa220.jpg (21 KB)

CuFa - siin liigud ainult külg ees!

RC drifti keskus Tallinnas


VMRC

Väike-Maarja mudelihall (Väike-Maarja)

Eesti suurim kuni 1/10 skaala mudelite off road siserada, RC huviring, RC üritused

Blog

Introducing WARHAMMER at ClayPitRC

03.06.2026
Introducing WARHAMMER at ClayPitRC
To tell this story honestly, we have to start from the beginning. Or perhaps somewhere in the middle.
 
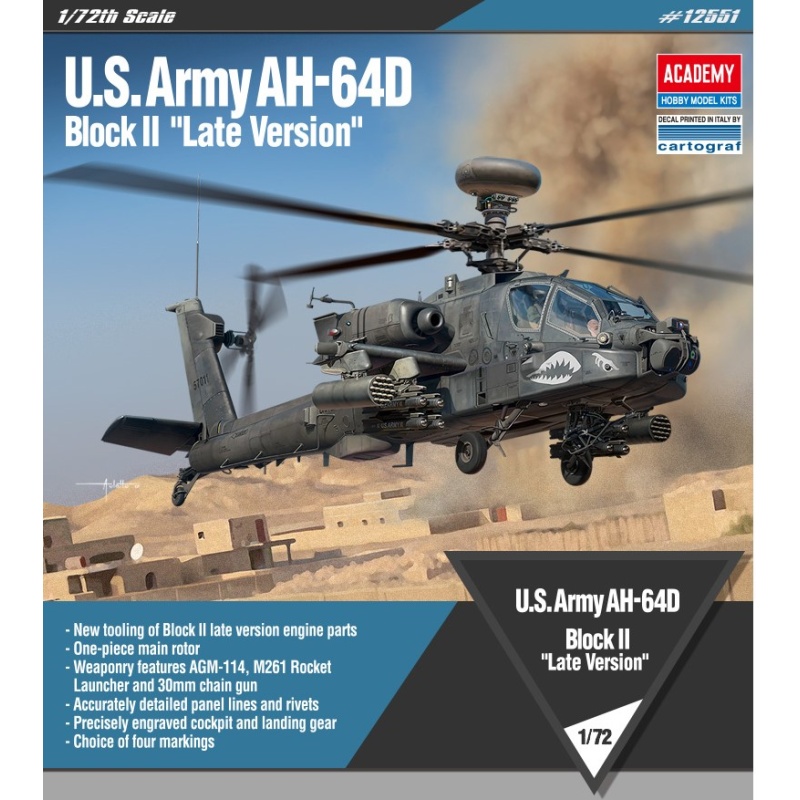
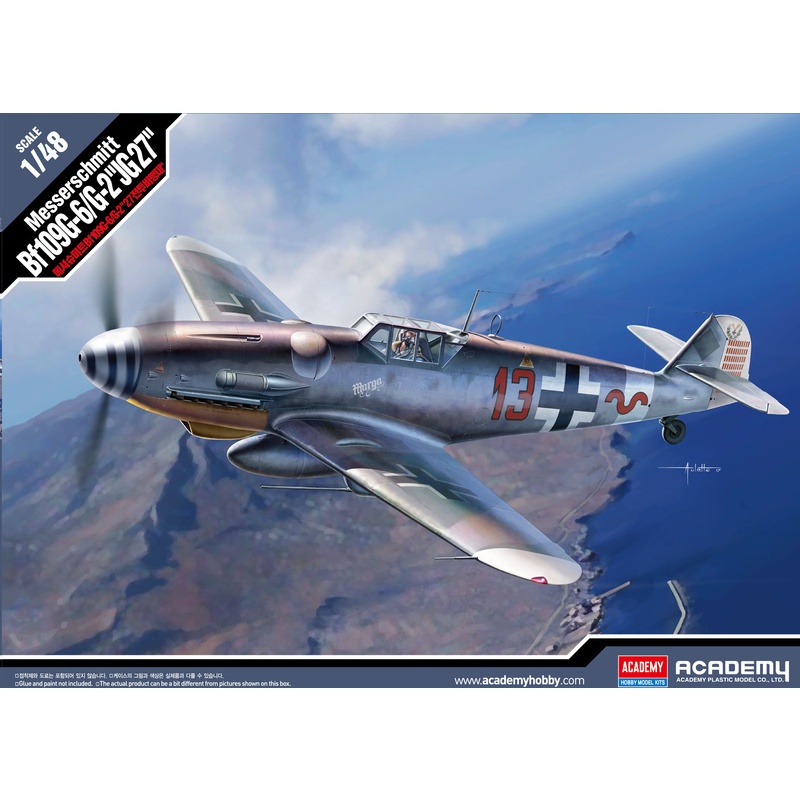
Most of you know and recognize ClayPitRC as a dedicated hobby shop specializing in high-performance RC cars, and over the last few years, detailed plastic scale models. However, evolution is necessary, and our ultimate goal is to become a complete hobby hub that offers the widest possible selection of model-related gear. While it isn’t our official motto, it certainly could be: "A person needs to rest and play," and we want to provide the perfect opportunity to play during your downtime.
 
RC racing is a fantastic way to enjoy active recreation—whether you are turning laps on a fast track, crawling through a forest, or ripping up a gravel pit with friends. Plastic scale modeling is perfect for solo tinkering and developing your inner artistic side.
But something was missing—a bridge to connect these worlds. After a two-year analysis period, we decided to team up with Games Workshop, the legendary creators and manufacturers of the Warhammer tabletop gaming universe. No sooner said than done!
 

More Than Just a Tabletop Game: A Multi-Layered Hobby

While modern RC cars are built to be highly weather-resistant, there are still plenty of months in the year when indoor activities are much dryer and more appealing than playing out in the rain or cold. This is where indoor tabletop gaming truly shines.
With Warhammer, however, there are so many different aspects that make it a uniquely diverse hobby. Unlike a standard board game that requires zero effort to start, Warhammer offers an immense amount of preparation and creative work.
 
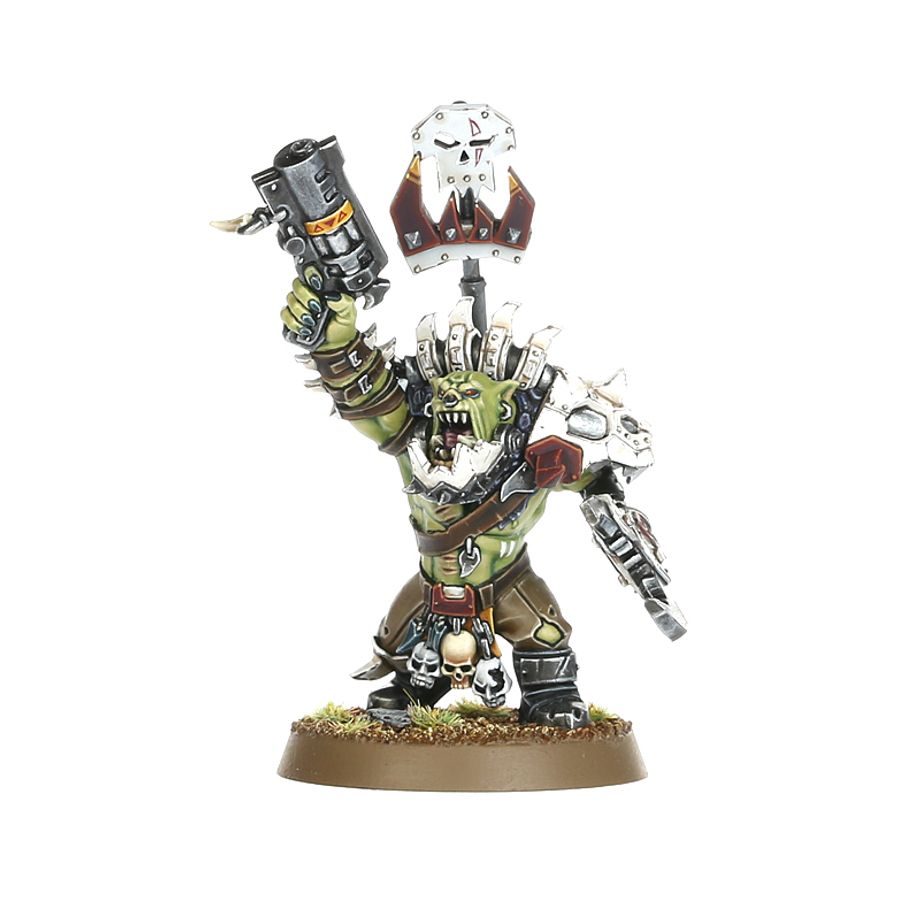
In fact, there are many Warhammer hobbyists who have never actually played a single match. Instead, they focus entirely on diving into the massive library of lore novels, collecting specific miniatures, and, of course, painting them. If you possess even a tiny bit of artistic spark—or if you don’t even know you have it yet—painting these figures can become a deeply meditative experience.
 
If starting out feels intimidating, YouTube is filled with excellent step-by-step tutorials. With a little bit of practice, you will soon feel an overwhelming sense of pride in your work, even if you have never held a paintbrush before.
 
There is something incredibly rewarding about watching a blank piece of grey plastic transform into a lifelike, battle-worn Ork

WH-40K-50-51_1.jpg (60 KB)

"What is Warhammer Exactly?" - you ask.
 
It is something that is difficult to summarize in just a few sentences.
 
Warhammer is an immersive, multi-faceted hobby centered around strategic tabletop wargaming. Every single battle is completely unique, unfolding on the tabletop through a blend of your chosen strategy and the rolling of dice. Warhammer encompasses several legendary fantasy and sci-fi settings, including:
  • Warhammer 40,000 (40K): Grimdark sci-fi battles set in the dystopian 41st millennium.
  • Combat Patrol: A streamlined, faster-paced version of Warhammer 40K using fixed box sets.
  • Age of Sigmar (AoS): High-fantasy battles featuring ancient warriors, gods, and mythical monsters.
  • Spearhead: A fast, tactical, and beginner-friendly way to play Age of Sigmar.
  • The Horus Heresy: A historical, tragic civil war set 10,000 years before Warhammer 40K, pinning space marine legions against each other.
  • The Old World: The return of classic square-base tactical fantasy battles featuring grand armies of knights, elves, and empires.
  • Middle-earth Strategy Battle Game: Tactical tabletop gaming set in the world of The Lord of the Rings and The Hobbit.
  • Kill Team: A fast-paced, skirmish-level game focusing on small, elite squads instead of massive armies.


How to Get Started

To play a game, you need a customized army consisting of your chosen faction's miniatures, a set of dice, and a rulebook.
 
If you are a complete beginner, the absolute best starting point is a Warhammer 40,000 Starter Set or an Age of Sigmar Starter Set. These boxes contain everything you need to learn the core rules and complete your first test games.
 
Alternatively, you can browse through the various factions, find the one that catches your eye visually, and pick up their specific "Combat Patrol" or "Spearhead" box set. These value bundles give you a complete, game-ready force in a single box at a massive discount compared to buying the models individually.
 
Once your initial force is built, you can selectively expand your collection to field massive armies and wage total war on the tabletop layout.

Building My First WIRC 1/8 Chassis: A Step-by-Step Experience and Lessons Learned

03.06.2026
Building My First WIRC 1/8 Chassis: A Step-by-Step Experience and Lessons Learned
As promised, here is my review and personal evaluation of assembling the new WIRC SBX-2 Nitro Buggy for the 2024 off-road summer season. If you haven't read my previous post about discovering the WIRC brand, I highly recommend checking that out first.
ClayPitRC received its first batch of three chassis kits in mid-March: the 1/8 scale electric buggy (SBXE-3), the nitro buggy (SBX-2), and the electric truggy (RTXE-1). All of them already had eager owners waiting to get their hands dirty. I kept the nitro buggy for myself, with the goal of testing the build quality firsthand and getting a WIRC platform running in every official class.

Unboxing and First Impressions
When I finally opened the box, I immediately noticed a missing detail: there was no paper manual printed inside. After checking with the other two owners, it turned out none of the kits included a printed booklet. Instead, there was an info sheet stating that the full assembly manual could be downloaded digitally from wircracing.com. Honestly, this makes perfect sense. You only use the manual during the initial build anyway, and this way the instructions are always updated to the latest revision while saving some paper.
The parts are neatly packed into 20 logical build stages. The box also contains the raw chassis plate, an unpainted lexan body shell, and an unnumbered bag containing the rear wing hardware. The packaging is flawless (5+)—everything you need for a specific step is contained within that exact bag, avoiding the classic hassle of hunting through multiple bags for a missing shim.

The Build Process: Step-by-Step Breakdown
The Differentials (Bags 1, 2, and 3)
The build kicks off with the three gear differentials. The kit includes a single bottle of 5000 cst silicone fluid to fill all of them. The center diff goes together first, featuring a unique, slightly elongated housing compared to the front and rear.
  • Observation: The internal shims that sit inside the diff case behind the outdrives are remarkably thick and heavy-duty—roughly 1mm. This is a massive upgrade over brands like Team Associated, which don't even use shims here. The sealing gasket fits with ultra-tight tolerances, creating a perfect leak-proof seal.
(Note: The manual indicates where to apply grease or threadlock, but these fluids are not included in the kit. I used high-quality black graphite grease on the designated points.)
Diff Bulkhouses & Shock Towers (Bags 4 and 5)
These stages assemble the front and rear bulkheads, input pinions, center driveshafts, and the rear carbon shock tower. The bulkheads are smartly engineered for quick access, allowing you to pull the diff out by removing just four screws.
  • The Trap: When I initially test-fitted the bulkhead cap with finger pressure, the diff had massive play, as if the bearings were missing. However, once I tightened the screws properly, the tolerances seated perfectly, and the excessive play disappeared completely.
Front Suspension (Bags 6, 7, and 8)
WIRC utilizes a classic pivot-ball front suspension layout. The suspension blocks are beautifully machined anodized black aluminum, using interchangeable plastic inserts (pills) to adjust geometry angles.
  • Critique: The molding quality on these plastic inserts could be slightly cleaner. They fit into the aluminum blocks with an extreme press-fit, meaning adjustments trackside will require some serious effort.
  • During Step 7 (installing the front sway bar and upper arms), my upper suspension binding felt slightly stiff when using all the provided shims. New competition kits often require a bit of track time to seat and "break in" smoothly.
Knuckles & Driveshafts (Bag 8 and 9)
The front steering blocks feature carbon-fiber steering links attached via screws. WIRC generously includes two steel pivot balls and two lightweight aluminum pivot balls in the kit.
  • The Challenge: While the lower pivot ball caps went into the plastic threads easily, the upper caps required immense force. Fearing I was cross-threading the plastic, I backed them out, but the threads were pristine. The fit is simply incredibly tight. I had to break out a socket wrench handle to leverage enough torque to thread the upper caps completely home.
Rear Suspension (Bags 9, 10, and 11)
The rear geometry went together smoothly, though I hit a small snag with the 5mm wheelbase spacer that sits between the rear hub and the arm. Following the manual's exact instructions caused the rear arm assembly to bind up. I replaced it with thinner 4.5mm shims from my pit box, which completely freed up the suspension travel while still allowing precise wheelbase adjustments.
Steering & Assembly (Bags 12 and 13)
The steering rack assembly is a textbook layout and went together without any drama. During Step 13, you secure the completed front and rear suspension clips onto the main chassis plate using the composite chassis braces. Everything lined up perfectly.
  • Tweak: The rear chassis brace mount requires two screws to mount onto the bulkhead. The kit supplies M3x12 button-head screws, but due to the recessed pocket, the surface contact felt insufficient to me. I substituted them with heavy-duty M3x10 cap-head screws which sat perfectly inside the recess for a much tighter mechanical lock.
Center Bulkhead & Brakes (Bag 14)
This nitro-specific stage handles the center diff mounts, brake discs, and pads. The brake pads are a premium two-piece design featuring authentic Ferodo friction material bonded onto red-anodized backing plates.
  • Tweak: The brake guide pins had a very tight fit through the pad backings (likely due to the red paint coating), preventing them from sliding freely. I ran a 3.2mm drill bit through the pad holes to open them up slightly. Once cleared, the brake system operated smoothly.
Clutch & Engine Mounting (Bag 15)
An unexpected component issue arose here: the kit did not include the flywheel collet (cone). Standard aftermarket collets are too short and disappear completely into the deep profile of the WIRC flywheel, meaning the flywheel would bind directly against the engine block. I contacted WIRC about this omission, and they promptly shipped the correct proprietary collet.
Fuel Tank & Radio Tray (Bags 16 and 17)
The fuel tank installation is straightforward, though the included silicone fuel line is far too short to route both the pressure line to the pipe and the fuel delivery line to the carb. I have advised the manufacturer to include a piece at least 10cm longer in future kits.
The radio tray is a clean, monolithic composite box housing both servos, the receiver battery, and the transponder.
  • Omission: The kit surprisingly lacks servo mounting screws and washers. For a high-end racing kit, these should be standard hardware. Thankfully, I had plenty of M3x12 button-heads in my pit box to complete the installation.
Shocks, Wing, and Linkages (Bags 18, 19, and 20)
The big-bore shocks went together perfectly. The kit comes with standard bladder caps and includes 600 cst shock oil for both front and rear, which I used for the baseline setup.
  • Great Feature: The lower shock mounting screws utilize reverse-threaded pins on the opposite side of the vehicle, which physically prevents the rotation of the suspension from backing the screw out during a race.
The included polycarbonate body shell cuts easily, and the throttle/brake linkages use a reliable, classic mechanical setup. However, I chose to replace the brake return springs with standard fuel tubing slices to achieve a smoother, more progressive braking feel.
  • Final Issue: The kit does not include the wire clip required to secure the front of the air filter housing. Without this brace, the filter element sits loosely under the body shell and rubs against the brake linkage. I have flagged this to the factory to ensure it becomes part of the standard kit layout.

Final Verdict: Does the WIRC SBX-2 Deliver?
I went into this build with a healthy dose of skepticism, expecting a lesser-known Italian boutique brand to suffer from loose tolerances or poor material fits. I was completely wrong. The machining on the metal components is world-class, and the entire buggy sits together with zero slop.
Aside from minor plastic flashing on small shims and a few omitted hardware pieces (servo screws, collet, filter wire), the execution is outstanding. Is it better than a Mugen, XRAY, or Associated? Time on the track will tell, but it is absolutely on the exact same premium tier. ClayPitRC only backs products that survive our strict quality control, and this Italian-bred racer has fully earned its place on our shelves alongside the world's best racing brands.


RC Cars and Sub-Zero Temperatures: Can You Drive in the Winter?

03.06.2026
RC Cars and Sub-Zero Temperatures: Can You Drive in the Winter?
The time of year has returned when days are short and the weather outside is freezing cold. Does this mean it is time to put your remote-controlled (RC) car into hibernation and wait for spring? This exact question is on the minds of many RC fans, and it is finally time for some answers.
 
While our previous articles have mostly been strictly fact-based, today’s topic comes down to personal preference. Driving outdoors in the cold introduces several critical technical aspects you must consider, but we can safely state that sub-zero temperatures are no reason to leave your model collecting dust on a shelf.
Based on our extensive track and bashing experience, here is what you need to keep in mind when hitting the frost:
  • Plastic Brittle Factor: The vast majority of RC components are molded from composite plastics. In freezing temperatures, these materials rapidly lose their elasticity, become highly brittle, and snap significantly easier upon impact.
  • LiPo Battery Protection: Ensure your driving battery is not as cold as the outside air when you start. Your LiPo pack should be pre-warmed to at least 10°C (50°F) before running. Cold batteries suffer from severe voltage sag, which limits power output and can permanently damage the cells under heavy load.
  • Snow Means Water: If you are blasting through snow, remember that you are fundamentally driving in wet conditions. Once you bring the car inside, the snow melts, meaning your vehicle will require immediate water-protection maintenance (refer to our previous maintenance guide!).
  • Frozen Ground Hardness: The terrain in winter is frozen rock-hard. If you are used to summer conditions where your model effortlessly crushes small dirt mounds or grass clumps, the effect in winter is the exact opposite—the frozen ruts will easily break your suspension components instead.
  • Keep Yourself Warm: The cold affects more than just the model—you need to stay warm too. Your hands will be highly vulnerable to the frost. Operating a transmitter with thick gloves is practically impossible due to lost precision, and thin gloves offer minimal protection during extended sessions.
  • Nitro/Gas Hibernation: If you own an internal combustion model—especially a nitro engine vehicle—it is highly recommended to put it into actual winter hibernation. Nitro engines cannot maintain their optimal operating temperatures in the freezing cold, and you will ultimately cause more wear and damage to your expensive engine than you get back in driving enjoyment.
  • Snow Depth Limits: Deep snow creates massive physical resistance. Unless you are running specialized paddle tires or a heavy-duty platform, the chassis will simply high-center and get stuck.


The Ultimate Winter Alternative: Indoor Tracks and Scale Realism

Driving outdoors in the winter comes down to how much you enjoy the elements. While summer and warmer temperatures are undeniably more hobby-friendly, you do not have to abandon your passion for the winter. One specific vehicle type that is absolute fun to drive in any season and weather is the Rock Crawler—their low-speed, high-torque nature makes them perfect trail companions in the snow.
 
But what if you hate shivering outside in the wind and spending hours cleaning snow, water, and mud off your chassis afterward? Fortunately, Estonia offers excellent indoor alternatives to keep your driving skills sharp during the winter months.
 
Dedicated indoor off-road tracks can be found in Saue and Väike-Maarja, while those looking to slide sideways can head straight to the RC drift track located at Stroomi Keskus in Tallinn.
 
Our local indoor off-road tracks feature special carpet layouts, meaning not every backyard basher can hit the track directly. These tracks are uniquely optimized for clean 1/10 scale electric buggies, which are also used for official winter racing championships. However, you can easily book track time for casual practice sessions without entering a competitive race—just make sure your model is fully cleaned and strictly powered by an electric motor. For the dedicated drift circuit, a specialized 1/10 scale RC drift chassis is required.
 

Time for Tabletop Engineering

If local indoor tracks are too far away, outdoor conditions are too brutal, or you simply prefer a cozy indoor project, winter is the perfect season to dive into the intricate world of plastic scale models.
 
Assembling and detailing highly realistic plastic kits of real-world military vehicles, aircraft, or classic cars is a fantastic shift in pace from heavy RC bashing. While it utilizes a different skill set than wrenching on a 1/8 scale buggy, it is incredibly rewarding, develops exceptional fine motor skills, and offers a deep dive into engineering and history through the model you build.
 
Whether you choose to brave the snow with a trail crawler, sharpen your racing lines on an indoor carpet track, or pick up a paintbrush for a detailed scale build, ClayPitRC has you covered all winter long.
 
Explore our Indoor RC Electronics or check out our premium Plastic Scale Models to start your winter project today!
 

RC Model Maintenance: A Guide for Beginner RC Car Enthusiasts

03.06.2026
RC Model Maintenance: A Guide for Beginner RC Car Enthusiasts

This time, we are diving into a crucial topic group that every beginner RC car owner needs to master: model maintenance and its related workflows. This article explores the answers to the most common questions we face every single day:
  • Is it necessary to maintain an RC model, how do I do it, and how often?
  • Am I allowed to repair and disassemble the model myself?
  • Can I drive my RC car in wet conditions, mud, or snow?
At first glance, you might wonder how water and RC cars tie together, but we promise there is a very direct and important connection. Read on to find out!
 

Your Model is Not a Perpetual Motion Machine

Whether you are currently planning to buy your very first model or have just recently become a proud owner, you must realize that an RC car is not a maintenance-free machine that only provides driving joy. A hobby-grade RC car is a relatively complex mechatronic device that requires care between battery packs.
 
Because hobby models are built to be driven outdoors, they come into constant contact with everything nature throws at them—dust, mud, water, gravel, and loose dirt. How often you need to service your model depends entirely on your driving environment and whether conditions are wet or dry. Models generally prefer dry environments, as dust doesn't stick to the chassis in massive clumps and has a harder time penetrating vital components like ball bearings, differentials, and oil-filled shocks.
 
Some manufacturers (such as ARRMA) outline specific maintenance intervals in their manuals, usually measured by battery cycles. It is highly recommended to follow these guidelines, but not every brand includes such a detailed breakdown. In those cases, the owner must evaluate the physical condition of the chassis and decide whether it's time for a partial or complete teardown.
 

"Am I Allowed to Disassemble and Repair the Model Myself?"

You might already guess the answer to this question: Yes, absolutely! In fact, disassembling your model is a mandatory and fully encouraged part of the hobby experience. Without stripping the model down to its core modules, it is physically impossible to perform proper maintenance, as you simply cannot access the components that need cleaning, shimming, or re-greasing.
 
We are frequently asked if washing the entire model under a shower or blast-cleaning it with a pressure washer is considered "sufficient maintenance." Blasting a fully assembled model with a pressure washer is something we strongly advise against, and here is why:
  1. Pressure washing pushes dirt into bearings: Even though the car looks sparkling clean after a high-pressure wash, it actually isn't. A pressure washer excels at forcing fine sand and moisture deep into places they should never go—such as rubber-sealed ball bearings, hinge pin blocks, and tight gear meshes. The end result is a clean-looking car that suddenly refuses to roll or binds completely.
  2. "Waterproof" does not mean rustproof: While many RC cars feature "waterproof electronics" on the box, you must apply common sense. An electric brushless motor will technically run completely submerged under water, but it is not watertight. Problems arise later when the internal iron components—such as the stator, shaft, and rotor bearings—begin to rust. Water and corrosion have a catastrophic, destructive effect on ball bearings.
If you want to wash your suspension and chassis parts with water, you must first completely disassemble the model, removing all electronics and ball bearings beforehand. Wash the composite plastic components separately where every single crevice is accessible.
 

How to Diagnose If Your Model Needs Service

If you aren't dealing with routine silicone oil changes inside your shocks or diffs and want to evaluate the general state of your drivetrain, the test is incredibly simple: Ensure the drivetrain rolls completely free of friction and does so without any unusual noises (squeaks, grinding, or clicking).
 
Since electric motors inherently create significant magnetic resistance when rolling, it is best to remove the motor pinion or back the motor mount away to disengage the gear mesh. Roll the chassis across a flat table with your hand. It should glide smoothly.
If you hear a gritty grinding or high-pitched squeak, your first task is to check all wheel bearings. Ball bearings are consumable wear items. Fine dust, water, and mud will inevitably bypass the seals over time, causing the internal grease to wash out and the steel balls to seize. During a routine overhaul, if you find a bearing that feels gritty, rough, or is completely locked up, it must be replaced immediately. Most high-quality bearings can be cleaned, re-lubricated with bearing oil, and resealed if caught early before internal pitting occurs.
 

Pre- and Post-Run Visual Inspection

A basic inspection should be carried out before and after every single battery pack. This is mostly a visual sanity check:
  • Ensure all chassis screws are tight (especially metal-to-metal screws secured with threadlock).
  • Clear out any foreign debris (like small rocks wedged near the outdrives or steering rack).
  • Check for excessive slop or play in the wheels. A wobbling wheel usually means either the wheel nut has backed off, or the wheel bearings are blown and about to disintegrate entirely.
You should also frequently inspect your spur and pinion gear mesh, especially if your platform uses an open gear cover, a slipper clutch, and a composite plastic spur gear. Clean the internal debris out of the power module regularly. At the same time, check your motor bearings—particularly the front bearing right behind the pinion. If you detect lateral or axial play in the motor shaft, replace the motor bearing immediately. If a motor bearing disintegrates at high RPM, the rotor will slam into the stator, instantly destroying the internal electronics and forcing you to purchase a completely new motor.
 

The Reality of Running in Mud, Water, and Snow

Driving in wet, muddy, or snowy conditions can be incredibly fun, but you must accept that every hour of wet bashing demands hours of meticulous maintenance at your workbench afterward.
 
Moisture causes rapid, severe corrosion on all steel hardware—screws, turnbuckles, cvd driveshafts, and bearings will rust overnight if left damp. Furthermore, water usually carries ultra-fine abrasive silt or sand. This slurry acts exactly like liquid sandpaper, grinding down your suspension arms, outdrives, and drive pins at an accelerated rate.
We have seen models brought into our shop that were driven in salt water at the beach and left unserviced. In multiple instances, the corrosion was so catastrophic that rebuilding the veermik and replacing the seized electronics would cost significantly more than buying a brand-new RTR kit.
 

In Conclusion

Enjoy your model, push it to its limits, and go find some mud if that brings a smile to your face! Just remember to match that driving joy with proper, routine maintenance at your pit table. Keep your veoahel clean, your bearings oiled, and your gear mesh set, and your hobby gear will reward you with exceptional performance run after run.


Here is a video on the ClayPitRC YouTube channel, where you can watch the maintenance of an Arrma Kraton 4x4 4S main drivetrain from start to finish: