



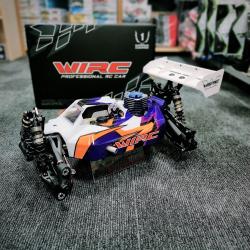
As promised, here is my review and personal evaluation of assembling the new WIRC SBX-2 Nitro Buggy for the 2024 off-road summer season. If you haven't read my previous post about discovering the WIRC brand, I highly recommend checking that out first.
ClayPitRC received its first batch of three chassis kits in mid-March: the 1/8 scale electric buggy (SBXE-3), the nitro buggy (SBX-2), and the electric truggy (RTXE-1). All of them already had eager owners waiting to get their hands dirty. I kept the nitro buggy for myself, with the goal of testing the build quality firsthand and getting a WIRC platform running in every official class.
Unboxing and First Impressions
When I finally opened the box, I immediately noticed a missing detail: there was no paper manual printed inside. After checking with the other two owners, it turned out none of the kits included a printed booklet. Instead, there was an info sheet stating that the full assembly manual could be downloaded digitally from
wircracing.com. Honestly, this makes perfect sense. You only use the manual during the initial build anyway, and this way the instructions are always updated to the latest revision while saving some paper.The parts are neatly packed into 20 logical build stages. The box also contains the raw chassis plate, an unpainted lexan body shell, and an unnumbered bag containing the rear wing hardware. The packaging is flawless (5+)—everything you need for a specific step is contained within that exact bag, avoiding the classic hassle of hunting through multiple bags for a missing shim.
The Build Process: Step-by-Step Breakdown
The Differentials (Bags 1, 2, and 3)
The build kicks off with the three gear differentials. The kit includes a single bottle of 5000 cst silicone fluid to fill all of them. The center diff goes together first, featuring a unique, slightly elongated housing compared to the front and rear.
- Observation: The internal shims that sit inside the diff case behind the outdrives are remarkably thick and heavy-duty—roughly 1mm. This is a massive upgrade over brands like Team Associated, which don't even use shims here. The sealing gasket fits with ultra-tight tolerances, creating a perfect leak-proof seal.
(Note: The manual indicates where to apply grease or threadlock, but these fluids are not included in the kit. I used high-quality black graphite grease on the designated points.)
Diff Bulkhouses & Shock Towers (Bags 4 and 5)
These stages assemble the front and rear bulkheads, input pinions, center driveshafts, and the rear carbon shock tower. The bulkheads are smartly engineered for quick access, allowing you to pull the diff out by removing just four screws.
- The Trap: When I initially test-fitted the bulkhead cap with finger pressure, the diff had massive play, as if the bearings were missing. However, once I tightened the screws properly, the tolerances seated perfectly, and the excessive play disappeared completely.
Front Suspension (Bags 6, 7, and 8)
WIRC utilizes a classic pivot-ball front suspension layout. The suspension blocks are beautifully machined anodized black aluminum, using interchangeable plastic inserts (pills) to adjust geometry angles.
- Critique: The molding quality on these plastic inserts could be slightly cleaner. They fit into the aluminum blocks with an extreme press-fit, meaning adjustments trackside will require some serious effort.
- During Step 7 (installing the front sway bar and upper arms), my upper suspension binding felt slightly stiff when using all the provided shims. New competition kits often require a bit of track time to seat and "break in" smoothly.
Knuckles & Driveshafts (Bag 8 and 9)
The front steering blocks feature carbon-fiber steering links attached via screws. WIRC generously includes two steel pivot balls and two lightweight aluminum pivot balls in the kit.
- The Challenge: While the lower pivot ball caps went into the plastic threads easily, the upper caps required immense force. Fearing I was cross-threading the plastic, I backed them out, but the threads were pristine. The fit is simply incredibly tight. I had to break out a socket wrench handle to leverage enough torque to thread the upper caps completely home.
Rear Suspension (Bags 9, 10, and 11)
The rear geometry went together smoothly, though I hit a small snag with the 5mm wheelbase spacer that sits between the rear hub and the arm. Following the manual's exact instructions caused the rear arm assembly to bind up. I replaced it with thinner 4.5mm shims from my pit box, which completely freed up the suspension travel while still allowing precise wheelbase adjustments.
Steering & Assembly (Bags 12 and 13)
The steering rack assembly is a textbook layout and went together without any drama. During Step 13, you secure the completed front and rear suspension clips onto the main chassis plate using the composite chassis braces. Everything lined up perfectly.
- Tweak: The rear chassis brace mount requires two screws to mount onto the bulkhead. The kit supplies M3x12 button-head screws, but due to the recessed pocket, the surface contact felt insufficient to me. I substituted them with heavy-duty M3x10 cap-head screws which sat perfectly inside the recess for a much tighter mechanical lock.
Center Bulkhead & Brakes (Bag 14)
This nitro-specific stage handles the center diff mounts, brake discs, and pads. The brake pads are a premium two-piece design featuring authentic Ferodo friction material bonded onto red-anodized backing plates.
- Tweak: The brake guide pins had a very tight fit through the pad backings (likely due to the red paint coating), preventing them from sliding freely. I ran a 3.2mm drill bit through the pad holes to open them up slightly. Once cleared, the brake system operated smoothly.
Clutch & Engine Mounting (Bag 15)
An unexpected component issue arose here: the kit did not include the flywheel collet (cone). Standard aftermarket collets are too short and disappear completely into the deep profile of the WIRC flywheel, meaning the flywheel would bind directly against the engine block. I contacted WIRC about this omission, and they promptly shipped the correct proprietary collet.
Fuel Tank & Radio Tray (Bags 16 and 17)
The fuel tank installation is straightforward, though the included silicone fuel line is far too short to route both the pressure line to the pipe and the fuel delivery line to the carb. I have advised the manufacturer to include a piece at least 10cm longer in future kits.
The radio tray is a clean, monolithic composite box housing both servos, the receiver battery, and the transponder.
- Omission: The kit surprisingly lacks servo mounting screws and washers. For a high-end racing kit, these should be standard hardware. Thankfully, I had plenty of M3x12 button-heads in my pit box to complete the installation.
Shocks, Wing, and Linkages (Bags 18, 19, and 20)
The big-bore shocks went together perfectly. The kit comes with standard bladder caps and includes 600 cst shock oil for both front and rear, which I used for the baseline setup.
- Great Feature: The lower shock mounting screws utilize reverse-threaded pins on the opposite side of the vehicle, which physically prevents the rotation of the suspension from backing the screw out during a race.
The included polycarbonate body shell cuts easily, and the throttle/brake linkages use a reliable, classic mechanical setup. However, I chose to replace the brake return springs with standard fuel tubing slices to achieve a smoother, more progressive braking feel.
- Final Issue: The kit does not include the wire clip required to secure the front of the air filter housing. Without this brace, the filter element sits loosely under the body shell and rubs against the brake linkage. I have flagged this to the factory to ensure it becomes part of the standard kit layout.
Final Verdict: Does the WIRC SBX-2 Deliver?
I went into this build with a healthy dose of skepticism, expecting a lesser-known Italian boutique brand to suffer from loose tolerances or poor material fits. I was completely wrong. The machining on the metal components is world-class, and the entire buggy sits together with zero slop.
Aside from minor plastic flashing on small shims and a few omitted hardware pieces (servo screws, collet, filter wire), the execution is outstanding. Is it better than a Mugen, XRAY, or Associated? Time on the track will tell, but it is absolutely on the exact same premium tier. ClayPitRC only backs products that survive our strict quality control, and this Italian-bred racer has fully earned its place on our shelves alongside the world's best racing brands.